Advisement

This blog is intended to share my experiences with you on what parts I use and how I use them and how I install them. I am sharing this information to help others who run into the same issues I may run into. I will be including lists of parts and tools as well as links to the items I have purchased. Please be sure to only use parts for your specific vehicle.

My Pages

Showing posts with label Amazon. Show all posts

Saturday, June 30, 2018

2000 Lexus RX300 shifter bushing replacement.

So the other day my wife was backing out of our driveway to go to the store and then couldn't shift into drive.   The shift lever only moved forward and back without much resistance.  It felt like the cable broke.   So we pushed it back into the driveway to get it out of the street.

After I removed the trim bezel to access the shifter assembly, I saw the cable hanging to the side of the shift lever pin.  Still in one piece, just not connected.   After inspecting it, I saw that the bushing holding the cable end onto the lever was broken into pieces.    Not as bad of damage as I was thinking.

I did some web searching and discovered that there was a replacement bushing available.   Rather than buy a new cable assembly, I went the cheap route.   This is our beater car and I wasn't going to spend more if I didn't have to.

So I purchased the BP1 bushing kit sold by Bushingfix.com on Amazon.com $30.00 USD and free shipping with Prime membership.

https://www.amazon.com/gp/product/B06XWDQCR4/ref=oh_aui_detailpage_o00_s00?ie=UTF8&psc=1

I got it in two days.

The replacement was quick and easy.  Only took about 10 minutes.   I could tell which direction to install it.  The video on youtube and on the bushingfix.com website did not show a clear distinction on what direction to install it.   So after watching the video and looking at the pictures I decide to put the notices in the piece towards the shift lever pin direction.

Installation
1 I removed the remaining broken pieces from the shift lever and cable eye.


2. I installed the bushing to the cable eye.  One side is notched and one side is not.   I installed with the notched side toward the shifter lever.   I just pushed it in with my fingers.   It was easy.  Just be sure the busing slides all the way onto the pin and has that snap in place feeling.


3.   I moved the shifter through the gears to be

Honestly, that was about it.  Very easy fix with this bushing.  I have driven around during the day and so far it has not fallen back off or had any issue.

Tools used in this post -  Flat blade screwdriver to remove wood bezel trim.

Parts used in this post - Bushing kit, BP1
https://www.amazon.com/gp/product/B06XWDQCR4/ref=oh_aui_detailpage_o00_s00?ie=UTF8&psc=1

(Note - I do NOT receive any compensation when you click the links.  They are for your ease of access only.  )


 Let me know if you have any questions or would like more detail. Thanks for reading.

Sunday, August 20, 2017

Replacing my rear torque mount and trans mount.


Over the last couple weeks I noticed that my cabin noise was more than usual.   I noticed that I was getting lots of engine noise and road noise resonating through the cabin.   Since the car is a box, it was pretty bothersome.   I noticed that I was getting clunking noise when I would quickly accelerate and then let off the gas.   I didn't really realize it until I decided to get under the car and look around to tight exhaust bolts.  I was thinking the bolts were getting loose over time causing more exhaust noise.

Well the reality was that my rear torque mount was broken.   It was broken pretty bad.  I had replaced this mount with one purchased from my local Oreily's auto parts.  This only lasted 27k miles.   Not worth trying another one in my opinion under warranty.   I saw that the exhaust pipe was actually resting on the sway bar causing the noise to be transmitted to the body and resonate in the cabin.   WOW.  I havens seen a broken mount this bad in years.   I replaced the torque mount and trans mount.   The focus of this post is the torque mount since it was the most difficult one to replace.   The trans mount is pretty self explanitory.

The broken old rear torque mount.
Replacement mounts

Minimal clearance with broken mounts.

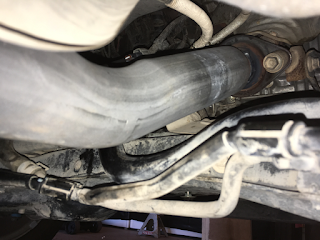
Exhaust resting on my sway bar transmitting noise to the cabin.

The broken mount I purchased from my local Oriole's auto parts when I replaced my clutch. 27k miles ago.

Remove the 2 nuts and 1 bolt for the mount.


Previously when I replaced this mount with my clutch replacement, I swapped the center mount bolt to go in from the passenger side.


Removed the passenger front tire to go in with an extension and socket to break loose and remove the rear torque mount center bolt. 

Going in from the wheel well.

My 14 mm swivel socket on the end of 1/2in drive extension.

Another view.


Before pulling out the bolt I supported the trans. 

My exentsions and socket and ratchet to access the torque mount center bolt.

I used a 14mm ratcheting wrench once the bolt was broken loose.

The new mount from Amazon.http://amzn.to/2fE1LV7

I loosened up the trans bracket bolts to give some wiggle. 

I loosened up the center bolt for the trans to body mount also.


With the center bolt removed I could wiggle the mount off the subframe and maneuver it out . 
Wiggle some more.

Wiggle even more.


Tilt and wiggle.

Coming out now.

Manuver past the exhaust, wires and power steering tubes. 


The old mount purchased from Oriely auto parts.  I won't puchase again. 


The new mount from Amazon

Side by side with the old and new mounts.  The new one looks smaller due to the camera angle, but they are the same.

Loosen and removed the 4, 19mm subframe bolts.  Be sure to support the sub frame to not damage the steering components.   I needed the extra space to get the bolts of the new mount into the subframe holes and align the trans bracket.

Sub frame bolt 19mm

Once the new mounts in place you can tight up and center the subframe.  


After the new mounts installed, there is clearance between the exhaust and the sway bar.


Tools used in this post - 14mm swivel socket, 17 mm swivel socket, 14mm impact socket, 17mm impact socket.  1/2in drive ratchet and breaker bar, 1/2 in drive extensions, pry bar, 14mm ratcheting box end wrench.


Parts used in this post -


Leave a comment to let me know if you have any questions or would like more detail.

Thanks for reading.


Sunday, August 13, 2017

USB Power Port installation

In this day an age it is pretty important to have power ports to be able to charge your phone, music player, etc.   So as an upgrade I installed this Dual usb power port.


I got it from amazon and thought it would fit next to the ash tray, but it was too small for that cut out in the plastic.  So I then decided to put it in the location next to the emergency brake handle.   Where the aux port is for the factory radio.  Since I replace the factory radio already, I didn't need the aux port their.


I started by connecting the pigtail that comes with the usb port to the connection behind the cigarette lighter.

I then ran the wires under the carped, and inside the plastic housing for the gear shifter.  


I ran the port into he whole in the plastic cover next to the brake handle. 

I installed it into place like so.   That is about it.  Pretty straight forward.


Parts used in this installation Dual usb power port.

 Dual USB port


Did you find this helpful?  Leave a comment and let me know any questions you may have.

Thanks for reading.


Friday, September 9, 2016

Clutch replacement

Yikes, my clutch is slipping when I step on the gas hard and when I'm letting out on the clutch pedal.


Just a note This is not a step by step explanation of how to replace your clutch, only my commentary on my experience doing it myself.   

So last weekend I replace the clutch in my Scion XB.  It was showing signs of slipping. When I would accelerate the RPMs would rise faster than expected in the vehicle speed would not accelerate as best as I had expected. Being on a budget I wanted to find parts that were cheap but also of quality.

So after searching around on Amazon and on eBay I decided to purchase an XTD clutch from an eBay seller. Here is the link to my purchase page.  Click Here. Normally I would go with a name brand such and LUK, or EXEDY, but money is tight.

I tried researching this brand of clutch but found that it was either hit or miss. Some people claim to have problems with their clutch but others seem to be perfectly happy with with the product they received. I decided to give it a try and hopefully it would've worked out. I ordered the clutch and received it within a couple of days.

I purchased the stage one version which includes the higher capacity clutch plate a clutch disk and a throw out bearing and the clutch alignment tool. Mine did not come with a pilot bearing or bushing.  According to the instructions the kit would have come with it if it was needed.


Removing the transmission from my Scion XB was fairly straightforward. No matter what I tried to do however there was no way to get around removing the sub frame in order to gain clearance to remove the transmission. Once the transmission was out and I removed my original clutch plate I found that my clutch disk was getting glazed which was causing my slipping.

It took me about 2 days to complete the job over the labor day weekend.  I did it in my garage and with only 1 floor jack.  Luckily the trans is not to heavy and I could maneuver it myself.  Lift and turn to align the down pins on the engine and trans that is.   Just be sure to have some added support so it does not fall on you.   Also, I didn't have an engine holder, so I used some long 2x4s and some ratcheting straps around the engine to hold it up in place.   Yeah, it was budget, but I'm not buying that engine holder for 1 job. Keep in mind that you have to lower or remove the subframe to get the trans out, be sure to mark the struts to the spindles so they go back in the correct spots and you don't have to re-align your car.    Be sure to have extra axle bolts if you take them off.

Now, Normaly I recommend replacing the transmission input shaft seal, and the engine rear main oil seal, but I did not want to pull off the flywheel and I didn't want to remove the bell housing for the trans seal.  So I inspected and didn't find any oil leaks, so I'm leaving them as they are.

Dusty but no signs of oil leaks
My old throw out bearing was still good, however since I had a replacement one as part of the kit I went ahead and replaced it.  I am a little worried that the XTD throw out bearing may not last very long.  I came across a couple online reviews of the bearing and found sometime they fail quickly.   

Old Throw out bearing is still in good shape.

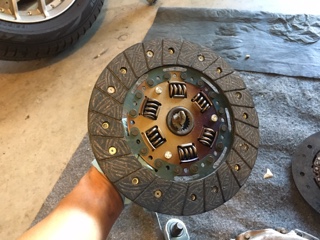
My old disc was getting glazed and hard spots causing my slipping clutch.  


New clutch cover and old one side by side.

New and old clutch disk side by side.  New one has more springs in the center.  Should be smoother engagement.


I decided to reuse my flywheel since it didn't look like it had hot spots, dis coloring, or glazing on the surface.   I used a sanding disc to rough up the surface and put a non directional finish on it.  Just like on brake rotors and drums.  

Non directional swirl finish so the clutch disc will break in.

Checking my new disc against my existing flywheel.  Remember to put the larger side facing the transaxle or the clutch will not work. 

Diameter of the flywheel and disc match.

The clutch cover plate bolts it on easily.  Be sure to tighten the bolts evenly and in the correct order.   


Repair manual torque spec and bolt pattern


While my vehicle was torn down, I discovered that all my mounts were deteriorated.   The rear mount and trans mount were broken and the engine right mount was week and I could flex it easily by hand.
So I went to my local Oriely's auto parts and got 2 of the mounts.  I'll wait for the trans mount at another time.   I also discovered my sway bar link bushings are bad.   More work of another time.

After reassembly the car drives much better than previously. I can feel positive engagement with the clutch, and the smoother engagement at the clutch pedal.  Engagement point feels just as it did with the stock disk and I don't feel much difference in the amount of petal pressure I need to apply to disengage. As of 09-09-16 I have put about 200 miles on the clutch and haven't noticed any problems.  It feels very stock and functional.   Its not a racing clutch so I don't expect to feel anything different.

Its meeting my expectations so far.

As a sidenote I installed regular gear oil and previously I was using Lucas gear oil. I can feel my shifter engage smoother and without grinding.

Do you have any questions or comments.  Please ask.  
Thank you so much for reading this.  Hope it helps you out.   
Vince.

Tools: 
1/2 inch drive impact, 
Sockets - 19mm, 17mm, 14mm, in deep, shallow, and swivel.   Half inch drive.
Ratchets - 1/2, 3/8, 1/4 drive.

Parts:


75w-90 gear oil.  


Stores:
Ebay
Oreily's auto parts.