
Over the last couple weeks I noticed that my cabin noise was more than usual. I noticed that I was getting lots of engine noise and road noise resonating through the cabin. Since the car is a box, it was pretty bothersome. I noticed that I was getting clunking noise when I would quickly accelerate and then let off the gas. I didn't really realize it until I decided to get under the car and look around to tight exhaust bolts. I was thinking the bolts were getting loose over time causing more exhaust noise.
Well the reality was that my rear torque mount was broken. It was broken pretty bad. I had replaced this mount with one purchased from my local Oreily's auto parts. This only lasted 27k miles. Not worth trying another one in my opinion under warranty. I saw that the exhaust pipe was actually resting on the sway bar causing the noise to be transmitted to the body and resonate in the cabin. WOW. I havens seen a broken mount this bad in years. I replaced the torque mount and trans mount. The focus of this post is the torque mount since it was the most difficult one to replace. The trans mount is pretty self explanitory.
 |
| The broken old rear torque mount. |
 |
| Replacement mounts |
 |
| Minimal clearance with broken mounts. |
 |
| Exhaust resting on my sway bar transmitting noise to the cabin. |
 |
| The broken mount I purchased from my local Oriole's auto parts when I replaced my clutch. 27k miles ago. |
 |
| Remove the 2 nuts and 1 bolt for the mount. |

 |
| Previously when I replaced this mount with my clutch replacement, I swapped the center mount bolt to go in from the passenger side. |
 |
| Removed the passenger front tire to go in with an extension and socket to break loose and remove the rear torque mount center bolt. |
 |
| Going in from the wheel well. |
 |
| My 14 mm swivel socket on the end of 1/2in drive extension. |
 |
| Another view. |
 |
| Before pulling out the bolt I supported the trans. |

 |
| My exentsions and socket and ratchet to access the torque mount center bolt. |
 |
| I used a 14mm ratcheting wrench once the bolt was broken loose. |
 |
| The new mount from Amazon.http://amzn.to/2fE1LV7 |
 |
| I loosened up the trans bracket bolts to give some wiggle. |
 |
| I loosened up the center bolt for the trans to body mount also. |
 |
| With the center bolt removed I could wiggle the mount off the subframe and maneuver it out . |
 |
| Wiggle some more. |
 |
| Wiggle even more. |
 |
| Tilt and wiggle. |
 |
| Coming out now. |
 |
| Manuver past the exhaust, wires and power steering tubes. |
 |
| The old mount purchased from Oriely auto parts. I won't puchase again. |
 |
| The new mount from Amazon |
 |
| Side by side with the old and new mounts. The new one looks smaller due to the camera angle, but they are the same. |
 |
| Loosen and removed the 4, 19mm subframe bolts. Be sure to support the sub frame to not damage the steering components. I needed the extra space to get the bolts of the new mount into the subframe holes and align the trans bracket. |
 |
| Sub frame bolt 19mm |
 |
| Once the new mounts in place you can tight up and center the subframe. |
 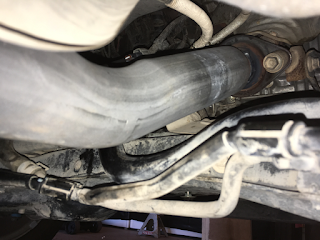 |
| After the new mounts installed, there is clearance between the exhaust and the sway bar. |
Tools used in this post - 14mm swivel socket, 17 mm swivel socket, 14mm impact socket, 17mm impact socket. 1/2in drive ratchet and breaker bar, 1/2 in drive extensions, pry bar, 14mm ratcheting box end wrench.

Parts used in this post -
Leave a comment to let me know if you have any questions or would like more detail.
Thanks for reading.


