So the other day my wife was backing out of our driveway to go to the store and then couldn't shift into drive. The shift lever only moved forward and back without much resistance. It felt like the cable broke. So we pushed it back into the driveway to get it out of the street.
After I removed the trim bezel to access the shifter assembly, I saw the cable hanging to the side of the shift lever pin. Still in one piece, just not connected. After inspecting it, I saw that the bushing holding the cable end onto the lever was broken into pieces. Not as bad of damage as I was thinking.
I did some web searching and discovered that there was a replacement bushing available. Rather than buy a new cable assembly, I went the cheap route. This is our beater car and I wasn't going to spend more if I didn't have to.
So I purchased the BP1 bushing kit sold by Bushingfix.com on Amazon.com $30.00 USD and free shipping with Prime membership.
https://www.amazon.com/gp/product/B06XWDQCR4/ref=oh_aui_detailpage_o00_s00?ie=UTF8&psc=1
I got it in two days.
The replacement was quick and easy. Only took about 10 minutes. I could tell which direction to install it. The video on youtube and on the bushingfix.com website did not show a clear distinction on what direction to install it. So after watching the video and looking at the pictures I decide to put the notices in the piece towards the shift lever pin direction.
Installation
1 I removed the remaining broken pieces from the shift lever and cable eye.
2. I installed the bushing to the cable eye. One side is notched and one side is not. I installed with the notched side toward the shifter lever. I just pushed it in with my fingers. It was easy. Just be sure the busing slides all the way onto the pin and has that snap in place feeling.
3. I moved the shifter through the gears to be
Honestly, that was about it. Very easy fix with this bushing. I have driven around during the day and so far it has not fallen back off or had any issue.
Tools used in this post - Flat blade screwdriver to remove wood bezel trim.
Parts used in this post - Bushing kit, BP1
https://www.amazon.com/gp/product/B06XWDQCR4/ref=oh_aui_detailpage_o00_s00?ie=UTF8&psc=1
(Note - I do NOT receive any compensation when you click the links. They are for your ease of access only. )
Let me know if you have any questions or would like more detail.
Thanks for reading.
My Scion Toyota Lexus Life
Chronicling my life with my 2006 Scion xB. I have been a Toyota tech for over 20 years. So I will be doing most work on this vehicle myself.
Advisement
This blog is intended to share my experiences with you on what parts I use and how I use them and how I install them. I am sharing this information to help others who run into the same issues I may run into. I will be including lists of parts and tools as well as links to the items I have purchased. Please be sure to only use parts for your specific vehicle.
My Pages
Saturday, June 30, 2018
Sunday, May 20, 2018
2000 RX300 Joins the family
So I recently purchased a 2000 Lexus RX300 for my wife.
We bought it for $1500. It was so cheap because it needed lots of work. The people selling it just wanted it gone so they could use the money for another car.
I worked for the Toyota/Lexus Engineering center in Los Angeles for 15 years, from 2000 to 2015. I Work on prototype vehicle development. So I'm pretty familiar with the Toyota, Scion, Lexus lines. I figured with my background I could get the car up to solid running condition. It was going to take time and money to do it. So I've been working on it off and on.
Here is a list of needed work, in no particular order.
The transmission would not shift into 4th gear. Code P0765 was stored for shift solenoid valve D (4) Problem. This code is a 4th gear performance code, not a electrical circuit code.
The key was broken.
The keyless entry remove didn't lock and unlock the doors.
The radiator was leaking.
The car had a clunking sound when shifting into D range on the shifter.
Both inner axle boots were split open.
Engine oil was leaking pretty bad.
Radio antenna doesn't roll up.
Drivers door lock does not lock/unlock with the switch.
Rear drivers side passenger door lock does not lock/unlock with switch.
Drivers window made bad noises when rolling and down.
Front passenger side window made noises when rolling up and down.
Radio speakers sounded bad in all 4 doors.
The Air conditioner blend door made grinding noise when switch modes.
Power steering belt was cracked.
Drivers side headlight bulb was out.
Rear struts were bad.
Thats most of the list. We also want to get some additional stuff. Seat covers, Buetooth connectivity for the radio. Some window stickers. Floor mats.
I will be posting progress on the work performed as things get done.
Stay tuned.
Same Bat time. Same Bat channel.
Tools used in this post - Parts used in this post - Let me know if you have any questions or would like more detail. Thanks for reading.
Sunday, August 20, 2017
Replacing my rear torque mount and trans mount.
Over the last couple weeks I noticed that my cabin noise was more than usual. I noticed that I was getting lots of engine noise and road noise resonating through the cabin. Since the car is a box, it was pretty bothersome. I noticed that I was getting clunking noise when I would quickly accelerate and then let off the gas. I didn't really realize it until I decided to get under the car and look around to tight exhaust bolts. I was thinking the bolts were getting loose over time causing more exhaust noise.
Well the reality was that my rear torque mount was broken. It was broken pretty bad. I had replaced this mount with one purchased from my local Oreily's auto parts. This only lasted 27k miles. Not worth trying another one in my opinion under warranty. I saw that the exhaust pipe was actually resting on the sway bar causing the noise to be transmitted to the body and resonate in the cabin. WOW. I havens seen a broken mount this bad in years. I replaced the torque mount and trans mount. The focus of this post is the torque mount since it was the most difficult one to replace. The trans mount is pretty self explanitory.
The broken old rear torque mount. |
Replacement mounts |
Minimal clearance with broken mounts. |
Exhaust resting on my sway bar transmitting noise to the cabin. |
The broken mount I purchased from my local Oriole's auto parts when I replaced my clutch. 27k miles ago. |
Remove the 2 nuts and 1 bolt for the mount. |
Previously when I replaced this mount with my clutch replacement, I swapped the center mount bolt to go in from the passenger side. |
Removed the passenger front tire to go in with an extension and socket to break loose and remove the rear torque mount center bolt. |
Going in from the wheel well. |
My 14 mm swivel socket on the end of 1/2in drive extension. |
Another view. |
Before pulling out the bolt I supported the trans. |
My exentsions and socket and ratchet to access the torque mount center bolt. |
I used a 14mm ratcheting wrench once the bolt was broken loose. |
The new mount from Amazon.http://amzn.to/2fE1LV7 |
I loosened up the trans bracket bolts to give some wiggle. |
I loosened up the center bolt for the trans to body mount also. |
With the center bolt removed I could wiggle the mount off the subframe and maneuver it out . |
Wiggle some more. |
Wiggle even more. |
Tilt and wiggle. |
Coming out now. |
Manuver past the exhaust, wires and power steering tubes. |
The old mount purchased from Oriely auto parts. I won't puchase again. |
The new mount from Amazon |
Side by side with the old and new mounts. The new one looks smaller due to the camera angle, but they are the same. |
Sub frame bolt 19mm |
Once the new mounts in place you can tight up and center the subframe. |
|
After the new mounts installed, there is clearance between the exhaust and the sway bar. |
Tools used in this post - 14mm swivel socket, 17 mm swivel socket, 14mm impact socket, 17mm impact socket. 1/2in drive ratchet and breaker bar, 1/2 in drive extensions, pry bar, 14mm ratcheting box end wrench.
Parts used in this post -
Leave a comment to let me know if you have any questions or would like more detail.
Thanks for reading.
Location:Surprise Arizona
Surprise, AZ, USA
Sunday, August 13, 2017
USB Power Port installation
In this day an age it is pretty important to have power ports to be able to charge your phone, music player, etc. So as an upgrade I installed this Dual usb power port.
I got it from amazon and thought it would fit next to the ash tray, but it was too small for that cut out in the plastic. So I then decided to put it in the location next to the emergency brake handle. Where the aux port is for the factory radio. Since I replace the factory radio already, I didn't need the aux port their.
I started by connecting the pigtail that comes with the usb port to the connection behind the cigarette lighter.
Parts used in this installation Dual usb power port.
Did you find this helpful? Leave a comment and let me know any questions you may have.
Thanks for reading.
I got it from amazon and thought it would fit next to the ash tray, but it was too small for that cut out in the plastic. So I then decided to put it in the location next to the emergency brake handle. Where the aux port is for the factory radio. Since I replace the factory radio already, I didn't need the aux port their.
I started by connecting the pigtail that comes with the usb port to the connection behind the cigarette lighter.
I then ran the wires under the carped, and inside the plastic housing for the gear shifter.
I ran the port into he whole in the plastic cover next to the brake handle.
I installed it into place like so. That is about it. Pretty straight forward.
Did you find this helpful? Leave a comment and let me know any questions you may have.
Thanks for reading.
Sunday, January 8, 2017
Installing additional dome lights.
Illuminating my interior.
My XB before installing all the lights. |
Since I use this vehicle for my mobile bartending business. ( www.bartendervince.com ), I need light to load my equipment after parties. It is usually dark and we are anxious to pack up and leave to get home and sleep. Since the car has so much space/volume inside, I wanted bright light to make sure visibility was awesome.
So after some digging on Amazon.com I came across these uxcell® DC 12V C White 46 LED Dome Roof Ceiling Interior Lights aftermarket interior dome lights. The reviews about them are mostly positive. After a few months of back and forth I decided to order 5 of them. I wanted 1 over each passenger, and them 1 in the luggage area. That area was the darkest of all. Each light has a 3 way switch - off, on, and door switch on.
So overall the installation was pretty simple. I started off by installing each light into the location I wanted them. Then I dropped the headliner so I could run the wiring and make the connections. Then it was a matter of testing the lights to make sure it all worked right. Then I put the headliner back in and sealed it all up. Thats sounds quick and easy but allow about a whole day to do it.
The contents of the package. |
The back of the light assembly and the mount. |
First I installed all the lights on the headliner.
I marked the spot to drill by poking a hole through the head liner. |
Using the mounting bracket to place my mark. |
Using a half in drill bit to drill a hole in the liner for the wires to go through. |
Run the wires through. When you install the light to the bracket, you will need to slide it toward you to feel the snap so the light housing locks in place. |
Installed light. |
Driver and passenger lights. |
Both rear seat lights. |
Remove the side pillar plastic. I used a 14mm socket to remove the bolt for the seatbelt anchor. |
The bottom of the plastic has this hook. slid it out, don't yank it out. |
Pull off the weather stripping too. This pulls right off around the doors. |
The rear window panels pull off. they only have these clips holding them in. |
At the back pull the head liner off these plastic holders. |
The rear plastic pieces interlock into the lower panels with these tabs. Don't break them. Remember this when putting it all back together so they all lock in nicely. |
There are 4 buttons that hold up the head liner at the back luggage area. |
Be sure to remove these buttons holding the rear of the headliner in place. |
remove the handles and pull the headliner from these plastic pieces to get it down. |
I pulled off these front pillar plastic pieces, but realistically if you let headliner hang you don't need them out. |
The headliner hanging down ready to run wiring. |
the headliner |
the factory dome light wires. |
How the roof looks. |
How I connected the wire, the wires, stripped back enough to twist. |
I folded over my 18 gauge wire. |
Wrapped electrical tape to isolate the wires and provide strain relief for the tiny light wire. |
On the left is the wire from the light, on the right is a 18 gauge wire I'm using. |
I ran each light's wire set through the dome light hole. |
I then connected the power wires, the ground wires, and the door switch wires with these wire nuts for home electrical work. |
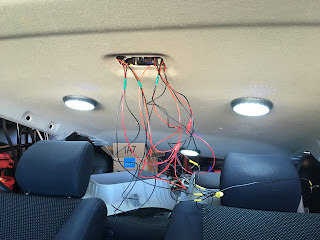
I tested the lights by using alligator clips and connecting to the factory dome light assembly. |
I didn't have a 3rd color wire to run, so I put yellow electrical tape on the black wire I used to connect the door light switch to the new dome lights. |
Here is the layout of my 5 lights I added in. |
I taped down he wires to the headliner so it stayed neat. I was sure to allow enough slack so if I ever had to remove a dome light, I could pull the light off and some wire and disconnect it. |
I used some wire taps to connect to the factory loom. Left side is positive, the right side is the door ground. |
Re installing the side plastic panels. |
Running the negative ground side through the housing. |
I ran the negative wire through the factory dome light housing, and put a spade terminal on the end to ground the manual on switch of all he lights. |
After installing them I decided to measure how much output they have. I used an app for my Iphone that measures the Lumen. I placed my Iphone on my center arm rest between my front seats and took measurements. In the dark, with just the drivers light on, I measured 22 lumen. With both front seat lights on I measured 49 Lumen.
Both front seat lights. |
Drivers seat light only. |
My opinion.
I really like the brightness of these lights. Honestly using 5 was overkill, but I couldn't realistically determine how bright they actually were till I had them in my hand. I think 2 would have been fine. 1 in between the front seats, and 1 in between the rear seats. Maybe a 3rd in the trunk area, but that would be optional. However I love how well lit my interior is at night when loading up my car.
Tools used in this post -
- 14mm socket with ratchet, for the seat belt anchors.
- 10mm socket and ratchet to remove the grab handles in the headliner.
- Electrical tape.
- Volt/ohm meter
- Test light
- #2 phillips screw driver
- 1/2 inch drill bit
- Cordless electric drill.
Parts used in this post -
- Uxcell DC dome lights
- 18 gauge wire, black and red, and if you can a yellow. Your need about 2 rolls of each.
Let me know if you have any questions or would like more detail. Thanks for reading.
Subscribe to:
Posts (Atom)